Residential

Wainscoting: In Pursuit of Excellence

As the recent owner of a 100 year old craftsman-style house, much of my free time is now consumed by home improvement projects. Of course, in the architecture profession, everything must strive for historical accuracy while still incorporating the right balance of modern elements.

After refinishing some floors, my attention has recently been on wainscoting the living and dining rooms to add in some historic character. While I haven’t landed on an exact solution, I have learned an awful lot about wainscoting.

Originally devised to protect plaster walls, wainscoting now serves a primarily decorative purpose. Over the last ~600 years it has been spun off into numerous styles. These are a few of the most familiar:

Wall Frames:

This type is typically seen in Victorian-style homes, usually in more formal spaces like the dining room. The cap and panel molding typically have an ornate, rounded profile.
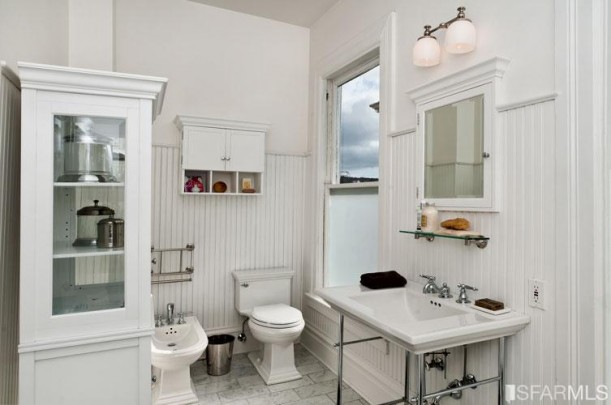
Bead Board:

Now sold in plank or sheet form and probably the most familiar, bead board is traditionally seen in cottage-style homes. This material is often a durable covering for entire walls and ceilings, or mixed with cap and base board moldings of various styles. 
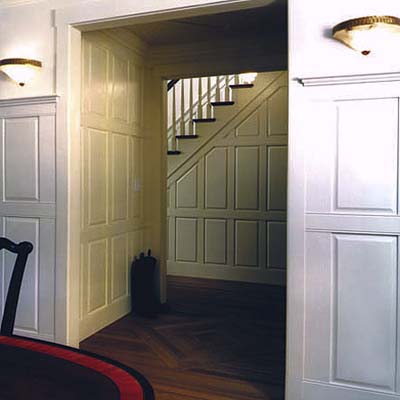
Raised Panel:

This is perhaps the oldest and most traditional wainscoting type in America, often seen in colonial-style homes. It can also be more complex to install and introduce more texture and depth than the types above.
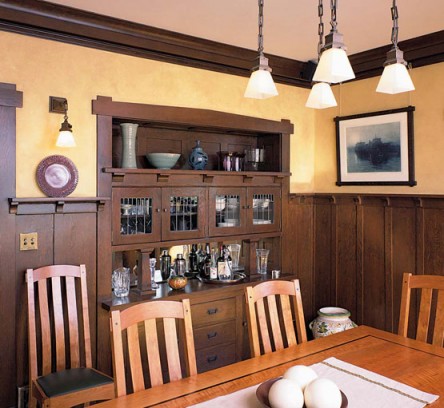
Board and Batten:

Also referred to as shaker wainscoting, board and batten reflects the simplicity of form that characterizes the craftsman style. This type is often extends 6 feet or more above the floor, and is capped by a flat rail.

Images:

http://www.colorsizzle.com/how-to-paint-a-room-with-molding/

http://www.apartmenttherapy.com/design-definitions-whats-the-difference-between-wainscoting-and-beadboard-175574

http://www.thisoldhouse.com/toh/wainscoting

http://artsandcraftshomes.com/wood-wainscot-revival/

1920's Era Bathroom Renovation Update

Four months later, the bathroom is finished- (the tub still needs to be re-glazed. Be warned...thinset will stain your tub)

For the light fixture above the vanity we chose a SchoolHouse Electric sconce in Natural Brass (Yes. I said brass) with a "turtle shade".

The handtowels are from Anthropologie, the Maleda Collection

1920's Era Renovation

So I recently found myself in the depths of a small bathroom renovation. It's fun and a great learning experience. It is, however, challenging when it is the only bathroom in your 600 square-foot 1920's era condo.

Essentially the toilet was ancient and inefficient, the pink plastic tile was popping off at every corner, and the existing hex tile was cracking.

The shower area had not been properly waterproofed and the existing tile wasn't even fully grouted. As a result, it was failing. After removing the tile we installed 1/4" cement board directly to the existing plaster wall and then we applied a Kerdi membrane on top of that. The Kerdi membrane is a waterproofing membrane and is applied with a layer of thinset on top of the cement board. After it's had time to dry it's ready for tile. The Kerdi system is a product by Schluter and is incredibly easy to install.

For the wall tile we opted for an affordable white ceramic subway- Daltile Rittenhouse tile, which is available at Home Depot. We chose Delorean Gray for the grout for a slightly dramatic look. 

While the walls were still in the process of being completed, we started busting out the existing floor. The existing floor was a marble hex tile installed on top of a mortar setting bed approximately 3 1/2" thick. Luckily once the tile was chopped up the mortar came out relatively easy.

After all the debris was cleared out we were able to prep for the new floor. We layered 3/4" plywood on top of the existing joists and then 1/2" cement board on top of that.

For the floor we opted for a more expensive marble hex tile with a lighter grout. We dry set and trimmed all of the pieces as necessary before laying the tile. We also marked and labeled each sheet so we knew exactly where it went. For the floor transition we used a Schluter floor transition strip.